As a medical student, you’ll eventually learn how to stitch a wound. I would recommend that you don’t wait for your school to start teaching you. You should take it upon yourself to learn it in advance. If you’re somewhat of a slow learner like me, you’ll want to get in a lot of practice before you can say that you’re ready to start suturing patients’ wounds.
This article will discuss how to go about stitching. I’ll go over when you’ll need it (versus a band-aid or skin glue), what to do before and after, and the different stitches that you’ll need. There are a lot of types of suturing techniques out there, but as a student, you’ll only be asked to do some basic ones.
What are Surgical Sutures?
Sutures, or stitches, are what you get when you need to hold body tissue together. Of course, you’ve likely seen stitches on cloth usually. Similarly, you’ll need a needle and thread for this. However, the needle and thread used are made specifically for suturing biological tissue. There are also special techniques or types of stitching for different purposes.
If you’ve seen a surgical needle, it’s unlike a sewing needle. It’s usually curved to allow for easy movement of the hand and minimal damage to the skin. When you use one in medical school, often it’ll already be threaded on the package.
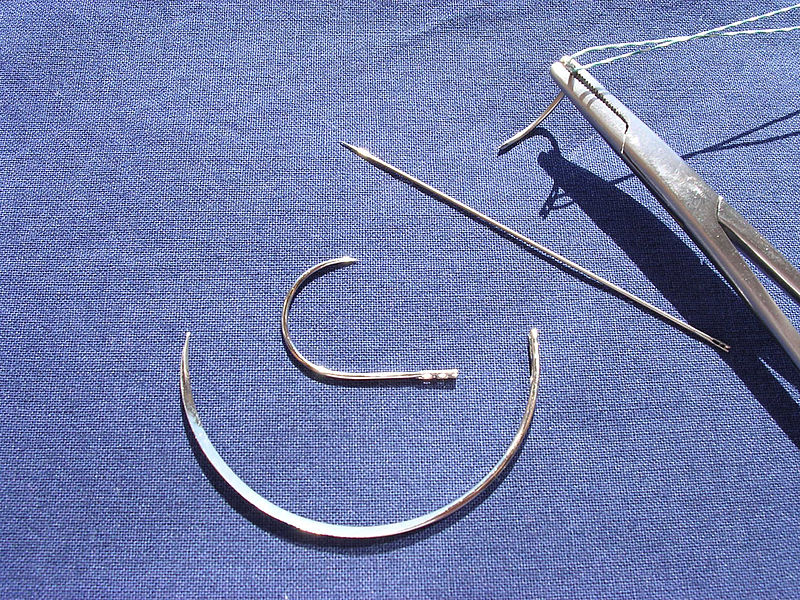
Curved and straight surgical needles
Image: “Surgical needles” by Rocco Cusari. License: Public DomainNext, there are different kinds of threads as well. You’ll learn in medical school the different pros and cons of different sutures. There are three classifications to consider when choosing a type of thread:
- Absorbable vs. non-absorbable
- Synthetic vs. natural
- Monofilament vs multifilament
Absorbable vs non-absorbable
Absorbable sutures are those that lose tensile strength from a few weeks to months. These are usually used for deep wound closure. After closing a deep wound, you’re not expected to remove the deeper stitches since the wound is already closed so the body should be able to naturally absorb them.
Non-absorbable sutures are used for long-term closure. This includes vessel anastomosis, vessel ligation, hernia fascial defects closure, etc. Basically, it’s the procedures where you don’t want your sutures to degrade. They’re also easier to use because they have less thread memory.
Memory refers to a suture’s tendency to return to its original shape. That means the knot is prone to coming undone.
Synthetic vs natural
When you think of synthetic sutures, it’s in the name– they’re made of man-made materials. A common material that you’ll see is nylon, polyester, etc. These sutures have great tensile strength. As opposed to natural sutures that degrade via proteolysis, synthetic sutures degrade via hydrolysis.
Natural sutures are made of biological material. This is silk or catgut usually. It has good tensile strength, is easy to use, and is secure. It minimizes friction and water absorption. However, they’re rarely used internally due to their loss of tensile strength from tissue reactions.
Monofilament vs multifilament
Monofilament sutures, as the name suggests, are single filaments. These sutures have high memory, which demands more skilled handling. Because of that, it’s recommended to do more knots to avoid its undoing. Since there’s only one filament, these sutures pass through tissue a lot more easily and are less inflammatory than multifilaments.
Multifilaments, although more prone to inflammation, are more secure and easier to handle. To make up for the material being harder to slide through tissue, it’s usually coated. It can also be coated with antibiotics to avoid any infections and inflammation.
Materials You’ll Need to Stitch a Wound
First, you have to prepare the tools you’ll need to suture. They may come as a set in a sterile package already or handed to you individually. This depends on how your clinic or hospital organizes their equipment.
The main thing you must have in mind is that when you handle sterile equipment, your gloves must also be sterile.
But first, here are the supplies you’ll need:
- Sterile gloves: Ideally, you should be using ones with the must snug fit. It’s easy to accidentally pierce gloves that are too big because of loose parts.
- Needle driver: This will be used to hold the needle. They look similar to scissors. Some places call it a needle holder.
- Tissue forceps: This is used to pick up tissue so that you can have more stable bites from the needle. Usually, these have a small tooth at the end to better grip flesh.
- Scissors: This is to cut the thread once you’re done.
- Sterile needle and thread: Usually the needles you get are already threaded. They must be sterilized because this is still considered a foreign object and can cause inflammation and infection.
- Sterile drape: This isn’t always necessary but it’s better to have it so that you can isolate the sterile field from the rest of the environment.
- Alcohol wipes, chlorhexidine, or povidone iodine: This can be anything you use to sterilize the area.
- Good lighting: This is very important to know how deep you’re biting and which tissue you’re suturing. This is also to avoid any avoidable accidents. No patient wants their doctor using sharp objects on them in the dark.
- Local anesthetic: Usually, we use 1% lidocaine with 1:200000 epinephrine.
- Gauze: This is to dab the area for bleeders and to dress the wound after.
- Proper waste disposal: This must include a separate sharps and infectious waste bin. This is to ensure proper disposal of dangerous materials and substances.
Steps on How to Prepare for Stitching
Next, you have to prepare the sterile area so that you can minimize any postoperative infections. Ideally, you have someone else to assist you in handling the materials. If you don’t have anyone to assist you, it’s advised you have a sterile placemat on a table to put all the sterile materials that you can only touch once you have your gloves on.
- Wash your hands. This usually takes a few minutes to do because your hands need to be as clean as possible, even though they won’t be directly touching anything.
- Wash the wound with distilled water. You don’t want any blood or debris blocking the way. You especially don’t want any dirt from outside infecting the wound.
- Put on your gloves. Usually, I wash my hands again after washing the patient’s wounds before I put on my sterile gloves.
- If you have a sterile drape, you can place it around the wound area at this point. Be careful not to touch anything that isn’t sterilized. Minimize moving about so that you don’t end up accidentally touching anything dirty.
- Prepare your supplies. They should already be available in a sterile area next to you. So, take the needle and clamp it onto the needle driver with your dominant hand, then have the tissue forceps in your other hand.
Types of Sutures
There are many kinds of sutures that surgeons use with different uses. Before we talk about how to suture, it’s important to know first what type of suture you’ll be using. For the purpose of this article, I’ll briefly touch on the most basic ones you’ll likely be asked to do as a student. Take note that you’re expected to master these by the time you start practicing in the field.
#1: Simple interrupted
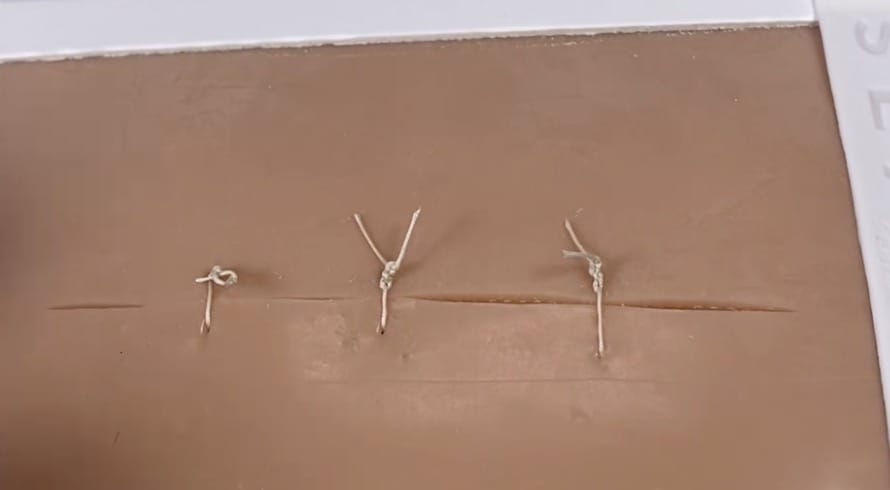
This is the most common and easiest suture to do because you do it one bite at a time, at regular intervals across the wound. However, it’ll also require a secure knot every bite you make. This technique is good for a wide range of scenarios. This is usually done on deep lacerations and surgical incisions. However, this technique can also be done to align the edges of an irregular-shaped wound and sometimes even for repairing nerves and tendons.
This technique is very versatile. However, there are many errors that can occur such as inadequate knotting which causes wound dehiscence or uneven spacing, which causes poor healing. Even inconsistent tension between the sutures can lead to poor wound healing and bad cosmetic outcomes for the scar. The sutures should look like this:
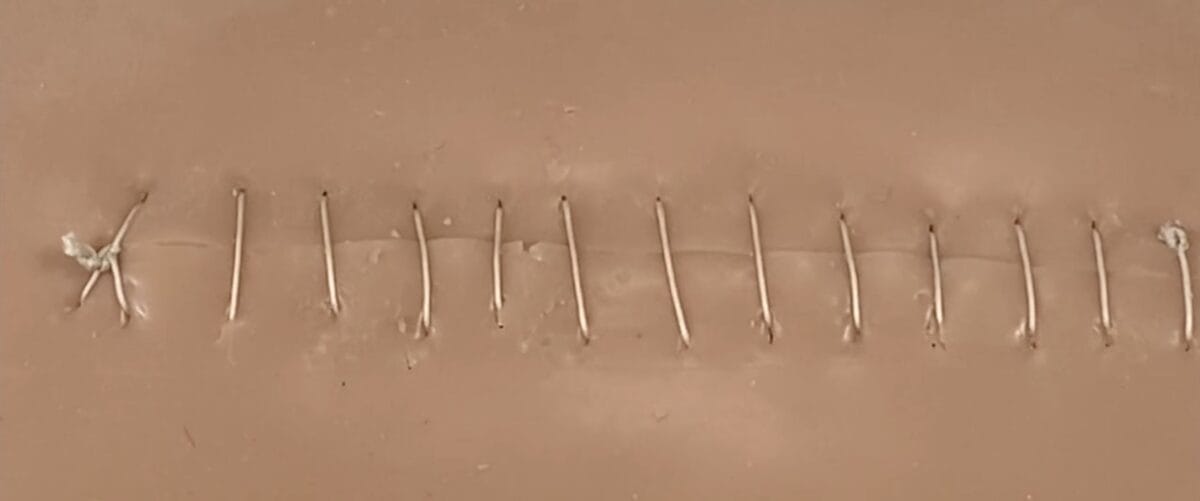
#2: Simple continuous
This technique is similar to the simple interrupted technique, except you don’t know after every bite. Using this technique is ideal for when speed is necessary (for example, an uncooperative pediatric patient). In this technique, you only need to knot at the first and last stitches. Due to its simplicity, it’s a lot faster and you use a lot less thread. This also ensures that the tension is evenly distributed across the sutures.
However, this technique has a higher chance of wound dehiscence because only the two ends are knotted. Should one side come undone, the whole line is damaged. Also, if one stitch breaks through tissue, the whole suture can also come undone.
So if you perform this, make sure that your knots are well-tied.
The end result should look something like this:
#3: Subcuticular
A running subcuticular suture technique, unlike the other techniques we’ve discussed, is superficial. The bites here are limited intradermally to around 1–2 mm deep.
This technique is usually used for cosmetic closures for smaller wounds with minimal tension. Never use the technique for larger wounds if you haven’t used a deep dermal suture to close the deeper tissue. Avoid using it as well for wounds with uneven or jagged edges where a simple interrupted suture would provide a better cosmetic outcome.

Take Lecturio’s Video Course on Suturing
Step-by-step visual tutorials with John Russell, DNP
How to Stitch a Wound
Stitching a wound is hard to teach through words alone. It’s better that you watch tutorials on how to stitch while using this part as a guide. Make sure to dab the area with sterile gauze as needed to give yourself a better view of the tissue. Also remember to administer the anesthetic or else the patient will remind you in the worst way (i.e., screaming😱). So, here are the steps:
Step 1
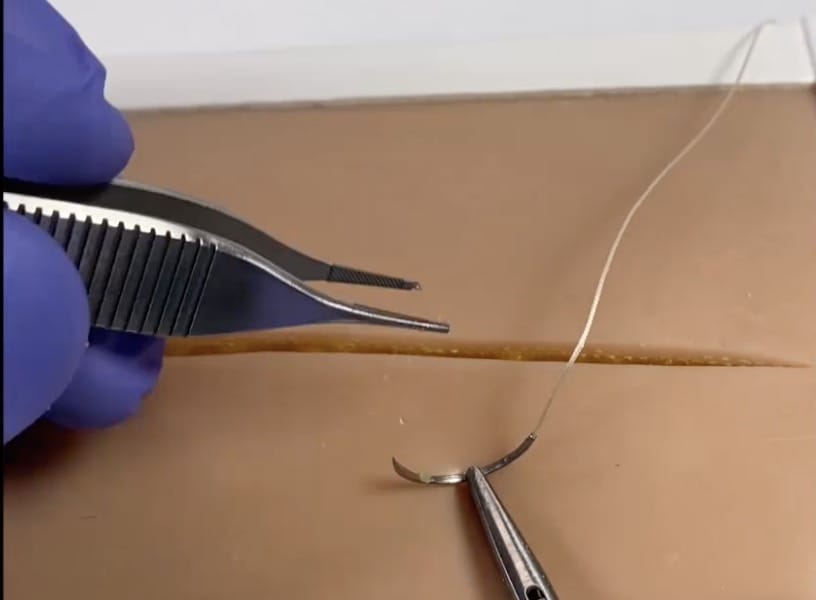
Load the needle holder with your needle, threaded with your chosen suture material. This is ideally placed ⅔ from the needle tip, or more specifically, use the tip of the needle holder to hold the middle of the needle at a 90-degree angle.
Step 2
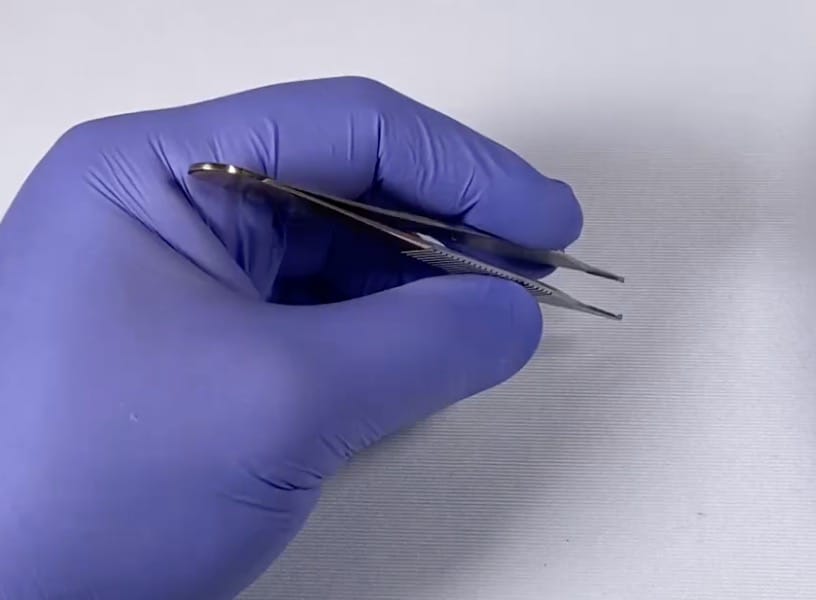
Use the tissue forceps to lift the tissue. Make sure you’re not pinching the skin. The purpose of the forceps is to hook the skin with minimal trauma to it. The proper grip is pictured below:
Step 3
Bite into the skin. 🧛… I don’t mean to physically bite, but use the needle to bite perpendicularly to the skin. If you’re using the common curve needle, you only need to have your hand supine then slowly pronate it to follow the proper curve. Do not force the needle into the skin in a straight line to minimize unnecessary trauma to the tissue. You’ll feel some resistance, but you’ll get used to it with practice.
Step 4
When you see the needle peek out from the other end, transfer your needle holder to that other end and pull it completely through.
Step 5
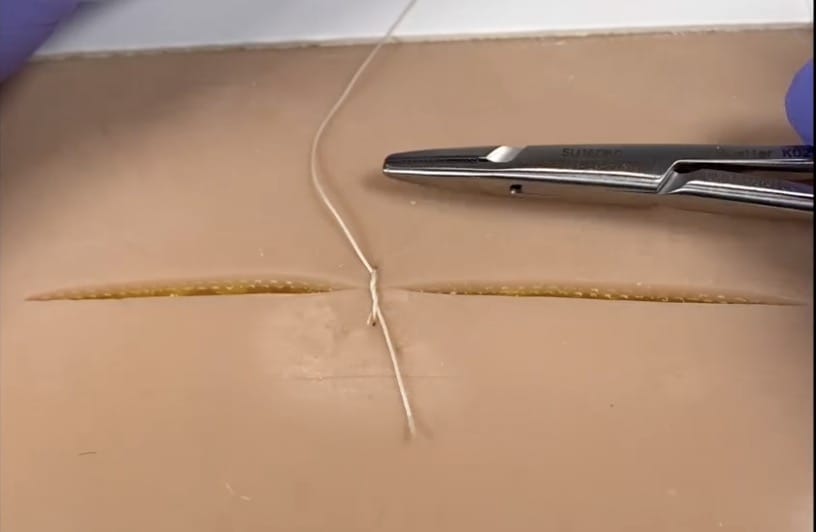
Assuming you did one full bite across the whole wound and you’re doing a simple interrupted suture, you can then finish it with a knot. Pull the thread through, allowing only just enough on the free end to do the knot. Release the needle from the holder, then loop the non-free end around your needle holder. The loop should go around the needle holder as so:
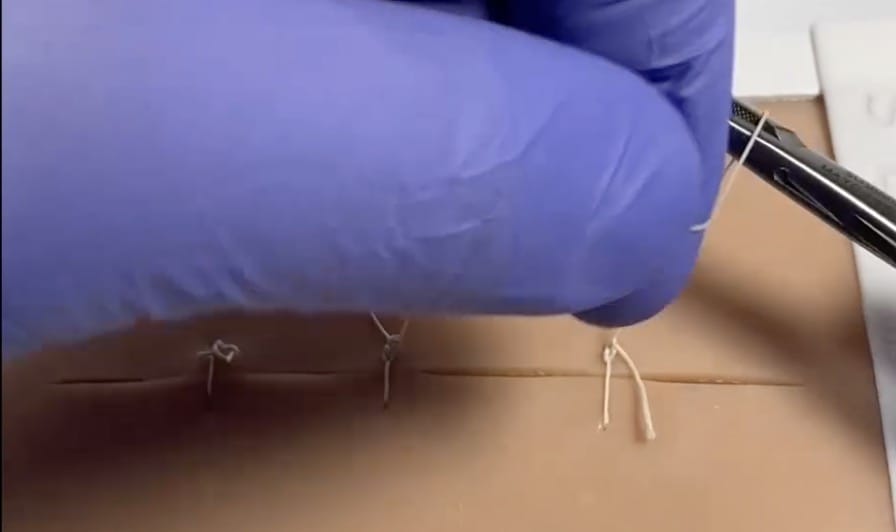
If this is the first knot, I usually loop 3 times. Use the holder to clamp the free end then pull it through the loop. The start of the knot should look like this:
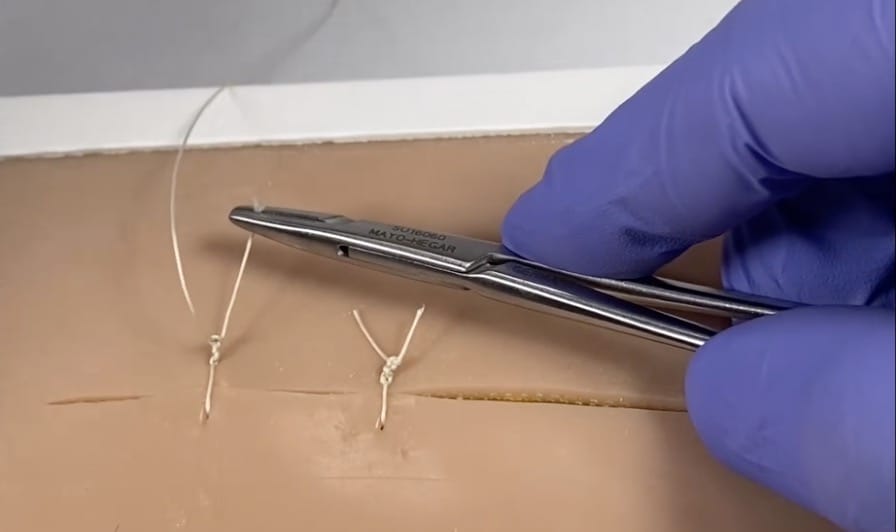
Do the same for the succeeding knots, except do only one loop. The succeeding knots should look like this:
Step 6
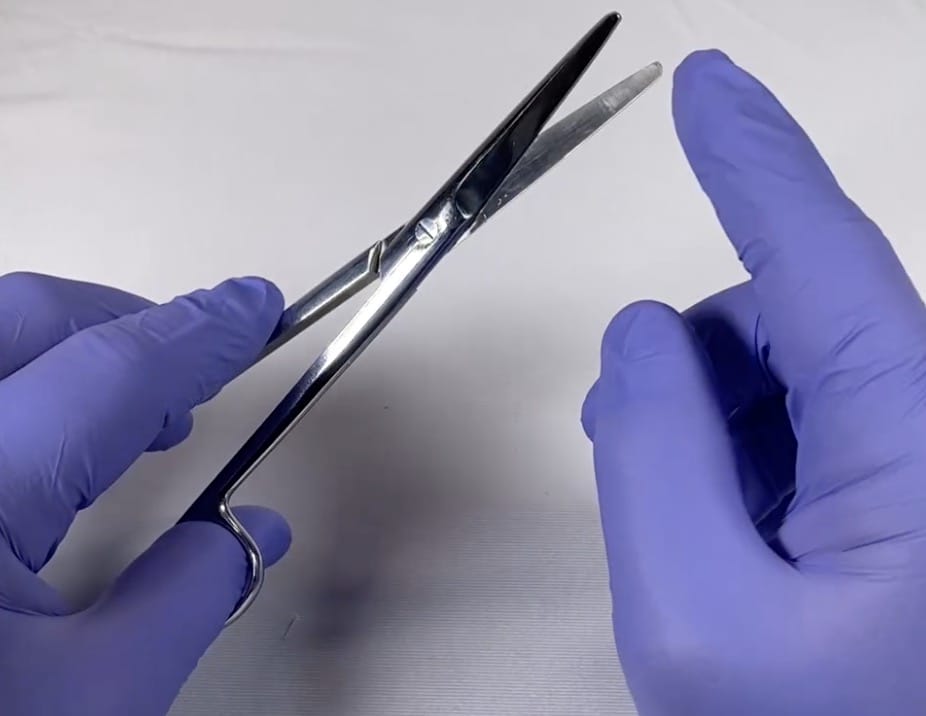
Next, pull until the wound is tight enough to make a secure knot, but not enough that it puts too much tension on the skin. Then, cut the knot with surgical scissors. The proper grip of the scissors can be seen here:
Repeat
Repeat. Do as many stitches as necessary, while remaining consistent in tension and distance.
After Stitching the Wound
After doing your last knot, you’re still not done yet. Stitching wounds doesn’t mean that the patient will completely stop bleeding or won’t need any intervention from that point on.
You need to dress the wound properly with (ideally) waterproof dressing. You should do this while still with the sterile area. Advise the patient to keep the wound clean and dry for at least 48 hours. Instruct them on how to change the wound dressing, if needed. Make sure to inform them of the signs of infection they should look out for and to follow-up should problems arise. They should also be informed of when they need to follow-up for stitch removal.
As for medications, it’s advised you consult your local guidelines as to which prophylactic antibiotics are the most appropriate. Make sure to clear your operating area and properly dispose of infectious waste and sharps in their proper place. For non-clean wounds, you should advise patients regarding possible tetanus prophylaxis.
